
Today, I have for you just a very quick tutorial :)
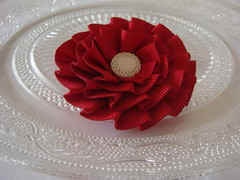
How to make a ribbon rosette brooch!

What you need:
Tools
Glue Gun
Scissors
Needle & Thread
Supplies
Pleated Ribbon (You can also make your own - click here to learn how)
Brooch back
Piece of leather (or stiff piece of felt, laceys stiff stuff - must be nice and firm)
Button or cabochon for centre piece
Instructions:
 |
| First, cut your base material into a circle to use as the base of your brooch. (remember, you don't need to use leather for this - felt and.or laceys stiff stuff would work great) |
 |
| Sew on the brooch back, whilst you are heating up your gluegun |
 |
| working from the outside in, run a rim of heated glue and stick your ribbon around the edges. continue to glue and spiral the ribbon towards the inside of the circle. Once you are close to the middle, cut the ribbon.  with pliers so then it will sit well in the middle  |
Simple eh? really really really simple!
remember if you do not want to make the pleated ribbon yourself, you can buy the ribbon already pleated from the internet! (like i did ... !)

Experiment with sizes, different ribbons, different buttons ...
use them as brooches, as keyrings, handbag charms ...
ENJOY!
x
They are fab Nicola. Thanks for the tutorial hun.
ReplyDeleteCarol XXX
Brilliant, fantastic pictures too :O) x
ReplyDeleteYou do make it look deceptively simple, but I'm willing to bet it wouldn't look quite like that in my hands! ;) Fab tute! x
ReplyDeleteBrilliant Nic!!..thanks for that..;o)x
ReplyDeleteHey there! I'd love to see you write a tutorial like this on my blog in the DIY section -- http://lorianderson-diy.blogspot.com/ -- please contact me if you're interested!
ReplyDelete