Friday, December 9, 2011

The Crafter..oo! Mystery Package Challenge

Ooooh Crafter...ooooooo! The new mag is out on the 1st January 2012.

I've had a bit of a stress getting my projects in, but they're all done now, and I can relax ...In the mag,  I have one project lined up, and I have written the blog reviews again ... (which is always my favourite bit, as it means my research is to catch up on all the wonderful crafty blogs that I follow ... hehe!)

On top of the features that I have written, I prepared a "Mystery Package" Challenge for members who were up for putting their crafty skills to the test. I know a lot of hard-core crafters at Crafter..oo! so the challenge was well received.

I decided not to participate in the challenge myself, as I did not want to be biassed on the supplies that I selected. I wanted just to go to my stash, bust out some fabulous things that go wonderfully well together... put them in piles and send them off!

I don't know if you're like me, but choosing the supplies for a project is an exciting part of the process. to be honest, it's probably my favourite part of the crafting process - as you have all the fun of pondering, mix and matching, brainstorming ... and this time I did not have the pressure of thinking what I would make with the selection. Instead I could concentrate purely on the aesthetics of everything ... not the practicality of what they'd be like in a project. Pure bliss!

1 piece of beige material (approx A4 size)
Lace and Ribbons
Beads and Buttons
Clear Cabochons
Vintage Paper taken from an old book


What would you make?

I have seen now all the creations that were made from these little packages - and I just want to say that they are more creative than what I could have imagined! Inspirational pieces. If you want to see what's been made - the big reveal will be in the E-Magazine - available for download from the 1st January!

Friday, October 28, 2011

Well, let me tell you ...

... about your versions of my "Pearl Cluster Necklace" Tutorial.

Firstly, let me say thankyou! The responses from the tutorial have been very flattering and I have been really chuffed to see it appear on Pinterest (and then get pinned and re-pinned again) and also the fabulous Beading Gem blog ... and at each and every location, I have appreciated every comment, and especially your emails and pictures.

There are so many tutorials and versions of how to make such style of necklace, so whilst I was putting the tutorial together, I did not think that showing people how to make this "my way" would have as much of an impact as it has done.

so, again thank you ... and moreso I need to give massive thanks to the creative people who sent me pictures of their interpretations. I knew that it would be a design that could be adapted to use different beads in different types, colours and sizes - and to see necklaces with a different flair really have made me grin like a cheshire cat ... and so much so, I want to share a few of my favourites with you too.

Firstly ... the first one that came in to fruitition, by the very talented Aster Sadler. She must have made this within days of the tutorial first being released. Absolutely gorgeous colour combination.


Asters Facebook Page - Seedy Beady

The next one of my favourties comes from Dorisanne Higgins - Mixing Pearly creams with Gold has given the neckalce such a luxourious style, and also shows how great the design can be for a bride.  I also love especially how she reduced the size of the beads at each end.


Dorisannes Facebook Page - A Little Bead Told Me

And finally on to one that shows how fabulous it is to use your bead soup!
From Ruth Duck at Pintail Jewellery ... Doncha just wanna get your hands in there and touch each different bead?!


Ruths Facebook Page - Pintail Jewellery

Here is another one from Jo, she is a member of the BeadBuddies Forum where I posted the tutorial. I was so happy to see a design using cubed beads.


So, I hope you like them. I hope to see more and more of what people do with the tutorial!


Thursday, October 13, 2011

Craft Pimp Team - Official Blog!

Hey everyone! :)

I know some of you know that I am a member of a great craft forum "CRAFT PIMP" which is a great place to gossip and share crafty wisdom and show off crafty items ... from sewing, to lampworking, to painting, to everything else ... the place is a great inspiration for any craftaholics like myself!


Well, now there is a blog to compliment the forum! *woop!* it also gives people the option to stay in touch with what's going on in their community though the blogpages if forums are not their thing.
If you're a sucker for crafty tutorials, subscribe to it as I don't think you'll be disappointed. All tutorials that are written by the forum members will make their way on to the blog pages! So you won't just get mine from SmittenKitten ... YOU'LL GET EVERYONES!

As you see, it's a brand new blog and it will feature more than just tutorials, it will have features and competitions too!

Go on ... follow it ... you know you want to! x

Tuesday, October 11, 2011

{Guest Blogger} Loki the Bobblecat

Hi, for those of you who have not had the pleasure of my company - let me introduce myself:

My name is Loki, and I have been led to believe by my house-humans that I am a "Bobblecat" whatever that means... I presume that since this word describes my breed, and considering that I only know other cats (not Bobblecats) that it must refer to the gorgeous multi-colours on my furrrrrrrrrcoat, and the fact that I have cheated death ... making me quite obviously a WINNER. If there are any other Bobblecats about, they would be winners too, but I have never had the luck to meet any other bobbles like me *meh!*

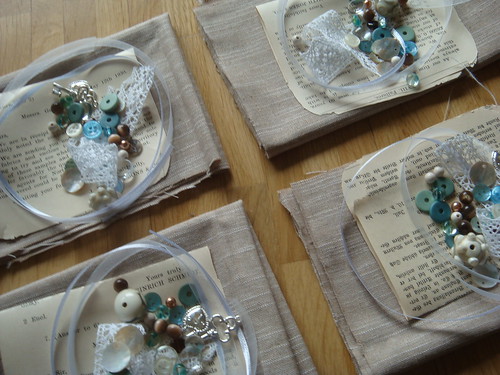
This past weekend - life was pretty normal ... I was getting a lot of attention from one of my house humans, who insisted on playing ribbons with me. Oh I love ribbons! The loops, twirls are easier to catch than "chirpers", ribbons are not as soft as chirpers, but still just as fun.

I got confused with one ribbon, as it had symbols on it, numbers and lines ... and the house human was not as playful with me when I wanted to play with this one, I do not understand why! She knows the rules of ribbons... it's fairly simple ... put them near me, in front of me, loop them round my body, run them around my neck, shake them a metre from me, or run them across my fur ... I ATTACK THE RIBBON! That's the rule! You show, you tease, you shimmy and shake the ribbon ... I POUNCE!!! and I'm great at it too ... I will dominate any ribbon that crosses my path.

Anymeow ... this past weekend I had a fairly successful Saturday night out on the hunt, looking for squeakers (you know - the things that squeak when they are squidged in your paws) and after feeling chuffed with my nights entertainment; I strolled back home just after sunrise, hungry for some supper. Food was served promptly as ever and off I went to find somewhere comfy for snoozies. I was very chuffed to find an open suitcase and off I snoozed dreaming about squeakers and chirpies.

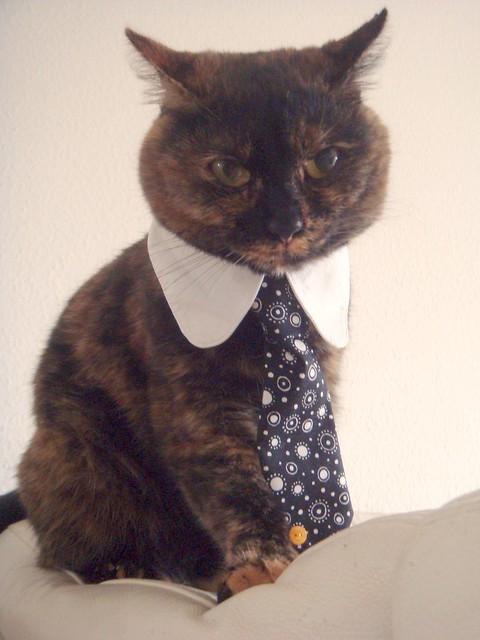
When I woke a few hours later ... given a quick yawn and a stretch, I bobbled into the lounge for some food. I walk around in a daze until I have some crunchies, so it is important to get some more food down me for the strenuous next few hours of meandering arounf the house ... but before I reached my bowl, I got scooped up my a human and after a few strokes and cuddles ...

I was suddenly wearing a new collar! 

Bobble darn it! Why am I so dosey when I wake up?

Normally I'd be alert enough to defy such suffering. It was only after I was plonked down on the couch, I realised to the full extent what had happened. I had the humans looking at me, checking out my expression... with machines that flash and there was lots of "oooh so cute" and lots of loving... don't get me wrong, I love the loving ... I'm a creature born to be pampered, it was just the accessory that confused me... Had I missed something? The latest issue of catsmopolitan maybe? or was it in Cat's weekly?  Oh ribbons... is this now fashionable?!

Well, for a further 5 minutes I bobbled round the house, every now and again looking down at the thing wondering if it was going to be a permanent accessory. I'm a diva in this neighbourhood, I don't know if I could face going outside meeting my friends as a cross-dressing-bobblecat, or maybe I could? remember I am the only Bobblecat in this neighbourhood... so trend setting possibilites are possible!

BUT ... Just as I was starting to think that I could set a new style in the 'hood, I was scooped up again for some pamperment and then my new accessory got taken off! Oh thankbobbles for that!!!

Will have to plan my revenge ... after I have played with some ribbons of course!

Pin It

Crafter..oo! E-magazine - Out Now!

Well, first off - it's been a month since I last posted *bad girl I am*
Well time really just has flown – this past month has been full of …

♦ More wedding plans (still got lots to do)
♦ Painting the eaves on our new house (painful boring work!)
♦ Travelling a lot with work to Hungary (all good, but time consuming none-the-less!)
♦ Visitors! (Dad coming to see me!)
♦ Finalizing my projects, features for the new Craft E-mag before it got published :)

I’ve been busy that’s for sure – so I hope to get back to normal soon.

The Crafter..oo! E-magazine is a quarterly crafting magazine that is compiled by members of the “Crafter..oo!” Craft forum community. With features, tutorials, projects, hints and tips, hot and not … it’s been such a pleasure to work with fellow crafters to come up with this great magazine. For only £1.50 – there 64 pages worth of goodies for you to download to your computer and read at your leisure. I have been really lucky to have my Hollow Book project featured, and I have also written a feature on the hottest blogs and also a blog hints and tips. I feel very lucky to be part of the mag, and I’ve already signed up to run a feature/tutorial for issue 2 as well.


Will be back soon to talk more crafting! ♥
take care
Nicola
x


Tuesday, September 6, 2011

How to make a Pearl Cluster Necklace - FREE TUTORIAL!

Good Morning!
I have 15 minutes to write this post before I actually have to start work! :) So I must be quick! x

At the weekend, I came across all the supplies I needed to remake an older creation of mine...  (How cool is that? No bead purchases! The gals at "Operation: Tackle That Bead Stash" will be proud of me).

A cluster pearl necklace that I had made over a year ago, and since I found more than enough supplies to remake it, I thought whilst I am at it, I'd write a tutorial to go with it.

So - if you want to learn how I made this necklace, and if you'd like to learn how to make it too, click on the link below to fly away to it. Would love feedback, or photographs if you make it too! (I'll be well chuffed if you send me pictures!) anyhoo ... enough babble ... must start work!


Hope you like it! ♥


Saturday, September 3, 2011

Quilled Earrings ... The start of an obsession maybe?

Recently, I've had quilling in my head. I have seen some really cool quilling art that has been truly inspirational. I know that if I pick up a quilling set and just get going, it's going to be a long way until I get as good as any of the things that I have pinned on my pinterest board. But, you know, you gotta start somewhere.

Even though I had bought a set with the idea of making a card for a colleague who is retiring, not suprisingly I got distracted with jewellery. (this is typical... once I concentrate on one craft, I get a craving to create with something different) But this time, they overlapped and I had inspiration to merge the two.

I have some stud earrings, that have a 12mm base diameter, I see them used for setting cabochons, buttons etc, but never before for quilling :) So, away I went with some simple circles and created these.


I got some nice postive comments, I even have an order for a pair from a colleague - and these were only experiments.


I wanted to try and do a more detailed pattern, I think practising on such a small palette will help me get better. My Quilling stick itself is far too big to make tiny quills, so I made my own using a needle. It's more fiddly to use, but it gives me a tighter scroll and i get more details with the smaller coils.

So, all set with me new needle quilling tool ... I have made some english daisies.


Again really, just an experiment... i still want to get better at quilling smaller patterns, but practice makes perfect. I think I'll be trying more of these in the near future.


 Hope you like them! Would love to hear what you think :)
So, - enjoy your weekend, if you're stateside, enjoy your long weekend.

take care
Nicola
x

Sunday, August 28, 2011

Pearls ... Pearls ... Pearls ...

This week I had received some lovely Mother of Pearl leaf drops from "The Bead Shed" so they'd sat at the top of my bead stahs waiting for me to do something with them. I had bought them with the idea of making them into earrings, pearly cluster earrings - and today my muse decided that today was the day to make them!

I gathered all that I needed to make them ...


Mother of Pearl leaf drops, lots of freshwater pearls and sterling silver components ...


perfect for a bride - or that little black dress.

I'll get them added into my Etsy shop later, it's been a while since I put anything in there :)

Hope you're having a great weekend

Lots of Love
Nic
x

(PS: I have been trying to comment on a lot of blogs over the past few days, but i'm failing miserably! - just wanna say that i'm not ignoring you, and I am loving every post - just getting sick of blogger and their comment bugs :( )

Wednesday, August 24, 2011

Stuttgarter Saturday Fleamarket (photo heavy)

You know, it was weeks ago when I went to the flea market – and I was going to blog about it ... and then, well, umm ... life got in the way and I didn’t do it ...*yeah I know I’m terrible!*


Joe was away on this particular Saturday driving to Aachen with a friend to buy a car, which means that he was on the road for about 8 hours so I got a Saturday to myself. (Which is rare)

This usually means a few things for me, get up late, read magazine on the sunny balcony whilst having my morning coffee, leisurely get ready and pop into the city for a mooch around.

Nearly every Saturday – Stuttgart has a fleamarket on karlsplatz which is right in the city centre. I am inspired always by peoples fleamarket thrifty finds that they blog about so I thought again I’I’d go and see what would inspire me.

Well, truth is – it’s a dream. It’s not just full of old stuff that has no use to no-one, it has old stuff that is treasure to new eyes that befall on them. (heh! … I really should be honest here, there is *also* shit and shite that no-one would want … but I just ignored that!)

I took lots of pictures – and truth is, I didn’t take enough. There is such a wide variety.

From furniture wanting a good home …


To chandeliers waiting to be lit …


Chandelier crystals ready for a repair or another crafty project …


Tons of vintage jewellery (to be honest this is one thing you will not get a bargain on, all vintage jewellery has an expensive price tag on this market)


To old photographs dating back to the early 20th century …


Bake ware …


Party dishes …


Beautifully random …


Glasses …


Trinkets …


I was inspired by so much (I wanted old books, chandelier pieces, photographs, that wonderful microscope, antique coins and dainty plates … )


I wanted so much that I walked away with nothing! So overwhelmed. Well, it gives me a reason to go back!

Monday, August 22, 2011

Ooooh yay! again... look what I won :)

I completely forgot to blog about this - here is the second thing I won on a blog giveaway recently.


It's a beaded cuff, made from the teeniest of seed beads, in a cow-print design :) perfect for wearing at work. (it matches my mug and my squishable-stress-cow)

It is from Ruthie at Pintail Designs! Thankyou Ruth for soing such a fabulous generous giveaway!
Only recently she started putting her work for sale on Folksy! Hope she has lots of luck and sales, and I for one can recommend her beautiful craftmanship so go and have a peek! :)

Here's a sneak preview of what she has for sale ...

Loe the colours in this bracelet


Pacman bracelet! hehe!

Tuesday, August 2, 2011

Yay! I won!

I was so lucky recently, to win not one, but TWO blog giveaways!
I love reading blogs, and I am a sucker for entering a giveaway.
I follow such great blogs of people who's work I admire, and spend a lot of my time online catching up with what people have been writing.

The first prize arrived today! Yay! Here it is in all it's glory!


Some of you may recognise it as the work of Louise Goodchild of COBWEBS CACHE. :) I have been following her work on FLICKR for over a year now, always commenting on my favourite pieces, astounded at the beautiful designs that she has for sale in her ETSY SHOP.

It's not just the actual craftwork of her pieces that stand out as being perfect, but her imagination just surprises me, she makes some amazing portraits of things I would have not dreamt of to do myself.

Here are a few pieces that she has currently for sale in her etsy shop or form her flickr photostream ... *love love love!*


how amazing is this one :)


Beautiful eh? Aren't I a lucky gal! x

Sunday, July 31, 2011

How to make a Button Bracelet! - FREE TUTORIAL!

This week, I came across a great pin on PINTREST that showed a gorgeous, simple, chic button bracelet, and I thought... "hey! I want to make one!" I have also been trying to think of an idea of a tutorial to submit to the Craft Pimp Tutorial Challenge too, so I decided to take pictures of how I made my version of this button bracelet so I can share here on my blog, and elsewhere on the web in my favourite places.

I searched out buttons from my stash, and ribbons too in colour coordinating colours and was happy to make a start on it. It's not usually the type of jewellery I make, so I was lucky to have everything for it without having to go to the craft store (which is a good thing, otherwise I would have bought lots from the craft store that I do not need! *lol* )

What you need ...

Materials
  • One bunch - Emroidery Silk
  • 40cms - Ribbon
  • 26-32 approx - 4 hole buttons (the amount of buttons of course depends on the desired bracelet length and the  size of the buttons)
Tools
  • Scissors
  • Big Eye Needle

I built up sections, 2 buttons with an individual tied connection with the embroidery silk. I tried doing many weaves through many buttons, but I ended up either in a tangled mess, or the structure of it was too weak. So, through trial and error, individual blocks of 2 gave it a strong structure (remember also to tie the string tight)

I built up these buttons up to the desired length of the bracelet. Connecting each button to the next with embroidery silk.
You can try building, and weaving sections of 4 at a time if you wish - as you think best for time saving, but remember saving time may not be the best for the structure, Ensure that each section is tied and secure, and that the buttons are firmly in place, and you are on to a winner ;)

Simple eh? Well - almost there ... Now it's time for the ribbon. Which is used as a nice design feature as well as your "clasp" As it is also used to fastne the bracelet when worn.


Weave through the buttons, like above - and there you have it!


A cute, simple button bracelet.

Friday, July 29, 2011

*Squeal!*

Right, I know a lot of you signed up to my blog to see the things that I am making, the creative stuff - and I can only apologise about the past few posts about having something about the house! (I know that you didn't sign up to get info on a house build ... )

BUT ... please ...  I need to share my excitement!

from this ...
Land (25.06.2011)
to this ...

hole (01.07.2011)
foundation (15.07.2011)
to this ...
Cellar WIP (26.07.2011)
to this ...
cellar WIP 2 (27.07.2011)
and today ... to this ...
Cellar Ceiling (29.07.2011)

Crazy progress this week ... Now on Monday the bricks will be delivered for our ground floor!