I have had a few little projects on the go recently, a crochet basketweave infinity scarf (which is actually already finished but not yet blocked), a quilt top - which still requires a batting and a bottom, and the minion mitts. It's the mitts that are finished! Hoorah!
Link to my Ravelry project page - HERE
Link to the original blog with original tutorial - TampaBayCrochet - HERE
Hope you like them! x
Showing posts with label tutorial. Show all posts
Thursday, August 14, 2014
Wednesday, February 19, 2014
The start of my 3D Mosaic Flower - Part 1 of 4
I've had a project stuck in my head for what seems like ages now. At least 6 months I'd say. Inspired by this "PIN" on pinterest [follow me here] I saw this amazing 3D mosaic flower that was truly inspiring. Inspiring so much so that I had to make something 3D and mosaic, (jump in to the deep end why not?!) Previously mosaic projects had never really inspired me. I'd never really looked at mosaic projects and thought "Yeah I wanna have a go" but this one got me daydreaming about making one of my own.
The mosaic experience I have is watching the husbeast tile the mosaic backsplash in the kitchen, or I'm sure I must have done it as an activity as a child, but I cannot think if I have done so or not! So - trust me, I'm no expert!
I'd imagine you learn to mosaic by doing nice flat things - trays and mirror frames, I have even thought about starting on a more simple project like that before attempting the flower to get used to working with the putty and playing with mosaic tiles - pfft, I dont know if I can be bothered with that! I just wanna get stuck in, learn by doing (learn by making a million mistakes - probably) and not starting with those simple projects - afterall - the 3D sculpture part of it is what has drawn me like a moth to a flame.
Hmmm ... Supplies ... Well, I haven't yet got everything - but I have enough to START.
• Alu-mesh (I got it from the DIY store about 4 months ago!)
• Plaster of Paris (Bought from Ebay about 6 months ago!)
So, husbeast went out to the pub last night - and once the baby was in bed, I went down to the hobby room, whilst watching a few of my favourite programs made a start on building the mesh.
I'm thinking tulip ... so, I cut out large petal shapes from my alu-mesh. Free-hand cutting.
I then attached them together by using craft wire. I used the wire as you would needle and thread, weaving in and out making look like a sewn seam. It does not have to be neat, it will be covered eventually.
Note: once you've cut the mesh - my god it can get prickly! Scratches, pricks, prods and pokes - I think I should have attempted it wearing long sleeves because my arms were itchy from all the contact with the cut edges, luckily no blood! Afterwards, I soothed my arms after I'd finished by putting antiseptic cream on! - so next time I do this, I'll be working with long sleeves for this part for sure!
I also added a mesh base, attached with the craft wire - and it started to look like princess lillifee's crown rather than the bulbus tulip shape that I want. So with more wire, I pinched the petals a little further up ...
Looking much better! I wish I could take better photographs of this stuff. It's a nightmare!
Next step will be to cast it in the plaster - the messy bit! I'm not a big fan of playing with messy sloppy stuff ... but it has to be done! I'm looking forward to having it cast into it's shape.
So, to be continued SOON! I'll probably find the time one evening this week to continue :)
The mosaic experience I have is watching the husbeast tile the mosaic backsplash in the kitchen, or I'm sure I must have done it as an activity as a child, but I cannot think if I have done so or not! So - trust me, I'm no expert!
I'd imagine you learn to mosaic by doing nice flat things - trays and mirror frames, I have even thought about starting on a more simple project like that before attempting the flower to get used to working with the putty and playing with mosaic tiles - pfft, I dont know if I can be bothered with that! I just wanna get stuck in, learn by doing (learn by making a million mistakes - probably) and not starting with those simple projects - afterall - the 3D sculpture part of it is what has drawn me like a moth to a flame.
Hmmm ... Supplies ... Well, I haven't yet got everything - but I have enough to START.
• Alu-mesh (I got it from the DIY store about 4 months ago!)
• Plaster of Paris (Bought from Ebay about 6 months ago!)
So, husbeast went out to the pub last night - and once the baby was in bed, I went down to the hobby room, whilst watching a few of my favourite programs made a start on building the mesh.
I'm thinking tulip ... so, I cut out large petal shapes from my alu-mesh. Free-hand cutting.
I then attached them together by using craft wire. I used the wire as you would needle and thread, weaving in and out making look like a sewn seam. It does not have to be neat, it will be covered eventually.
Next step will be to cast it in the plaster - the messy bit! I'm not a big fan of playing with messy sloppy stuff ... but it has to be done! I'm looking forward to having it cast into it's shape.
So, to be continued SOON! I'll probably find the time one evening this week to continue :)
Friday, October 28, 2011
Well, let me tell you ...
... about your versions of my "Pearl Cluster Necklace" Tutorial.
Firstly, let me say thankyou! The responses from the tutorial have been very flattering and I have been really chuffed to see it appear on Pinterest (and then get pinned and re-pinned again) and also the fabulous Beading Gem blog ... and at each and every location, I have appreciated every comment, and especially your emails and pictures.
There are so many tutorials and versions of how to make such style of necklace, so whilst I was putting the tutorial together, I did not think that showing people how to make this "my way" would have as much of an impact as it has done.
so, again thank you ... and moreso I need to give massive thanks to the creative people who sent me pictures of their interpretations. I knew that it would be a design that could be adapted to use different beads in different types, colours and sizes - and to see necklaces with a different flair really have made me grin like a cheshire cat ... and so much so, I want to share a few of my favourites with you too.
Firstly ... the first one that came in to fruitition, by the very talented Aster Sadler. She must have made this within days of the tutorial first being released. Absolutely gorgeous colour combination.
Here is another one from Jo, she is a member of the BeadBuddies Forum where I posted the tutorial. I was so happy to see a design using cubed beads.
Firstly, let me say thankyou! The responses from the tutorial have been very flattering and I have been really chuffed to see it appear on Pinterest (and then get pinned and re-pinned again) and also the fabulous Beading Gem blog ... and at each and every location, I have appreciated every comment, and especially your emails and pictures.
There are so many tutorials and versions of how to make such style of necklace, so whilst I was putting the tutorial together, I did not think that showing people how to make this "my way" would have as much of an impact as it has done.
so, again thank you ... and moreso I need to give massive thanks to the creative people who sent me pictures of their interpretations. I knew that it would be a design that could be adapted to use different beads in different types, colours and sizes - and to see necklaces with a different flair really have made me grin like a cheshire cat ... and so much so, I want to share a few of my favourites with you too.
Firstly ... the first one that came in to fruitition, by the very talented Aster Sadler. She must have made this within days of the tutorial first being released. Absolutely gorgeous colour combination.
Asters Facebook Page - Seedy Beady
The next one of my favourties comes from Dorisanne Higgins - Mixing Pearly creams with Gold has given the neckalce such a luxourious style, and also shows how great the design can be for a bride. I also love especially how she reduced the size of the beads at each end.
Dorisannes Facebook Page - A Little Bead Told Me
And finally on to one that shows how fabulous it is to use your bead soup!
From Ruth Duck at Pintail Jewellery ... Doncha just wanna get your hands in there and touch each different bead?!
Ruths Facebook Page - Pintail Jewellery
So, I hope you like them. I hope to see more and more of what people do with the tutorial!
Thursday, October 13, 2011
Craft Pimp Team - Official Blog!
Hey everyone! :)
I know some of you know that I am a member of a great craft forum "CRAFT PIMP" which is a great place to gossip and share crafty wisdom and show off crafty items ... from sewing, to lampworking, to painting, to everything else ... the place is a great inspiration for any craftaholics like myself!
Well, now there is a blog to compliment the forum! *woop!* it also gives people the option to stay in touch with what's going on in their community though the blogpages if forums are not their thing.
If you're a sucker for crafty tutorials, subscribe to it as I don't think you'll be disappointed. All tutorials that are written by the forum members will make their way on to the blog pages! So you won't just get mine from SmittenKitten ... YOU'LL GET EVERYONES!
As you see, it's a brand new blog and it will feature more than just tutorials, it will have features and competitions too!
Go on ... follow it ... you know you want to! x
I know some of you know that I am a member of a great craft forum "CRAFT PIMP" which is a great place to gossip and share crafty wisdom and show off crafty items ... from sewing, to lampworking, to painting, to everything else ... the place is a great inspiration for any craftaholics like myself!
Well, now there is a blog to compliment the forum! *woop!* it also gives people the option to stay in touch with what's going on in their community though the blogpages if forums are not their thing.
If you're a sucker for crafty tutorials, subscribe to it as I don't think you'll be disappointed. All tutorials that are written by the forum members will make their way on to the blog pages! So you won't just get mine from SmittenKitten ... YOU'LL GET EVERYONES!
As you see, it's a brand new blog and it will feature more than just tutorials, it will have features and competitions too!
Go on ... follow it ... you know you want to! x
Tuesday, October 11, 2011
Crafter..oo! E-magazine - Out Now!
Well, first off - it's been a month since I last posted *bad girl I am*
Well time really just has flown – this past month has been full of …
♦ More wedding plans (still got lots to do)
♦ Painting the eaves on our new house (painful boring work!)
♦ Travelling a lot with work to Hungary (all good, but time consuming none-the-less!)
♦ Visitors! (Dad coming to see me!)
♦ Finalizing my projects, features for the new Craft E-mag before it got published :)
I’ve been busy that’s for sure – so I hope to get back to normal soon.
The Crafter..oo! E-magazine is a quarterly crafting magazine that is compiled by members of the “Crafter..oo!” Craft forum community. With features, tutorials, projects, hints and tips, hot and not … it’s been such a pleasure to work with fellow crafters to come up with this great magazine. For only £1.50 – there 64 pages worth of goodies for you to download to your computer and read at your leisure. I have been really lucky to have my Hollow Book project featured, and I have also written a feature on the hottest blogs and also a blog hints and tips. I feel very lucky to be part of the mag, and I’ve already signed up to run a feature/tutorial for issue 2 as well.
Well time really just has flown – this past month has been full of …
♦ More wedding plans (still got lots to do)
♦ Painting the eaves on our new house (painful boring work!)
♦ Travelling a lot with work to Hungary (all good, but time consuming none-the-less!)
♦ Visitors! (Dad coming to see me!)
♦ Finalizing my projects, features for the new Craft E-mag before it got published :)
I’ve been busy that’s for sure – so I hope to get back to normal soon.
The Crafter..oo! E-magazine is a quarterly crafting magazine that is compiled by members of the “Crafter..oo!” Craft forum community. With features, tutorials, projects, hints and tips, hot and not … it’s been such a pleasure to work with fellow crafters to come up with this great magazine. For only £1.50 – there 64 pages worth of goodies for you to download to your computer and read at your leisure. I have been really lucky to have my Hollow Book project featured, and I have also written a feature on the hottest blogs and also a blog hints and tips. I feel very lucky to be part of the mag, and I’ve already signed up to run a feature/tutorial for issue 2 as well.
Will be back soon to talk more crafting! ♥
take care
Nicola
x
Tuesday, September 6, 2011
How to make a Pearl Cluster Necklace - FREE TUTORIAL!
Good Morning!
I have 15 minutes to write this post before I actually have to start work! :) So I must be quick! x
At the weekend, I came across all the supplies I needed to remake an older creation of mine... (How cool is that? No bead purchases! The gals at "Operation: Tackle That Bead Stash" will be proud of me).
A cluster pearl necklace that I had made over a year ago, and since I found more than enough supplies to remake it, I thought whilst I am at it, I'd write a tutorial to go with it.
So - if you want to learn how I made this necklace, and if you'd like to learn how to make it too, click on the link below to fly away to it. Would love feedback, or photographs if you make it too! (I'll be well chuffed if you send me pictures!) anyhoo ... enough babble ... must start work!
I have 15 minutes to write this post before I actually have to start work! :) So I must be quick! x
At the weekend, I came across all the supplies I needed to remake an older creation of mine... (How cool is that? No bead purchases! The gals at "Operation: Tackle That Bead Stash" will be proud of me).
A cluster pearl necklace that I had made over a year ago, and since I found more than enough supplies to remake it, I thought whilst I am at it, I'd write a tutorial to go with it.
So - if you want to learn how I made this necklace, and if you'd like to learn how to make it too, click on the link below to fly away to it. Would love feedback, or photographs if you make it too! (I'll be well chuffed if you send me pictures!) anyhoo ... enough babble ... must start work!
Hope you like it! ♥
Sunday, July 31, 2011
How to make a Button Bracelet! - FREE TUTORIAL!
This week, I came across a great pin on PINTREST that showed a gorgeous, simple, chic button bracelet, and I thought... "hey! I want to make one!" I have also been trying to think of an idea of a tutorial to submit to the Craft Pimp Tutorial Challenge too, so I decided to take pictures of how I made my version of this button bracelet so I can share here on my blog, and elsewhere on the web in my favourite places.
I searched out buttons from my stash, and ribbons too in colour coordinating colours and was happy to make a start on it. It's not usually the type of jewellery I make, so I was lucky to have everything for it without having to go to the craft store (which is a good thing, otherwise I would have bought lots from the craft store that I do not need! *lol* )
What you need ...
Materials
I built up sections, 2 buttons with an individual tied connection with the embroidery silk. I tried doing many weaves through many buttons, but I ended up either in a tangled mess, or the structure of it was too weak. So, through trial and error, individual blocks of 2 gave it a strong structure (remember also to tie the string tight)
I built up these buttons up to the desired length of the bracelet. Connecting each button to the next with embroidery silk.
You can try building, and weaving sections of 4 at a time if you wish - as you think best for time saving, but remember saving time may not be the best for the structure, Ensure that each section is tied and secure, and that the buttons are firmly in place, and you are on to a winner ;)
Simple eh? Well - almost there ... Now it's time for the ribbon. Which is used as a nice design feature as well as your "clasp" As it is also used to fastne the bracelet when worn.
Weave through the buttons, like above - and there you have it!
I searched out buttons from my stash, and ribbons too in colour coordinating colours and was happy to make a start on it. It's not usually the type of jewellery I make, so I was lucky to have everything for it without having to go to the craft store (which is a good thing, otherwise I would have bought lots from the craft store that I do not need! *lol* )
What you need ...
Materials
- One bunch - Emroidery Silk
- 40cms - Ribbon
- 26-32 approx - 4 hole buttons (the amount of buttons of course depends on the desired bracelet length and the size of the buttons)
- Scissors
- Big Eye Needle
I built up sections, 2 buttons with an individual tied connection with the embroidery silk. I tried doing many weaves through many buttons, but I ended up either in a tangled mess, or the structure of it was too weak. So, through trial and error, individual blocks of 2 gave it a strong structure (remember also to tie the string tight)
I built up these buttons up to the desired length of the bracelet. Connecting each button to the next with embroidery silk.
You can try building, and weaving sections of 4 at a time if you wish - as you think best for time saving, but remember saving time may not be the best for the structure, Ensure that each section is tied and secure, and that the buttons are firmly in place, and you are on to a winner ;)
Simple eh? Well - almost there ... Now it's time for the ribbon. Which is used as a nice design feature as well as your "clasp" As it is also used to fastne the bracelet when worn.
Weave through the buttons, like above - and there you have it!
A cute, simple button bracelet.
Sunday, May 22, 2011
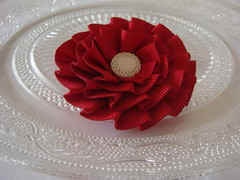
How to make a ribbon rosette brooch! - FREE TUTORIAL!
Today, I have for you just a very quick tutorial :)
How to make a ribbon rosette brooch!
What you need:
Tools
Glue Gun
Scissors
Needle & Thread
Supplies
Pleated Ribbon (You can also make your own - click here to learn how)
Brooch back
Piece of leather (or stiff piece of felt, laceys stiff stuff - must be nice and firm)
Button or cabochon for centre piece
Instructions:
| First, cut your base material into a circle to use as the base of your brooch. (remember, you don't need to use leather for this - felt and.or laceys stiff stuff would work great) |
| Sew on the brooch back, whilst you are heating up your gluegun |
Simple eh? really really really simple!
remember if you do not want to make the pleated ribbon yourself, you can buy the ribbon already pleated from the internet! (like i did ... !)
Experiment with sizes, different ribbons, different buttons ...
use them as brooches, as keyrings, handbag charms ...
ENJOY!
x
Saturday, May 21, 2011
Operation Kindle #2 - How to make a hollow book! - FREE TUTORIAL!
I love my kindle (yeah you probably have already gathered this!) I have read so many books recently that it has become a comfort blanket for me. I nearly always have it with me - and when I can steal a moment for myself and my kindle, well then i'll take it.
I can be in the best of company - and I imagine I am becoming quite rude and unsociable, but OK, I don't mind being in the pub with my fella and his buds, but if the talk becomes too technical (about beer/football... etcetera) then whilst they're supping booze, i'll be more than happy to curl up in the corner, order a cuppa tea and start reading!!!
I think i am going to have to start separating myself from it ... leave it at home and go cold turkey on it so when I am out in company, I can concentrate on friends, regardless of how technical the subject may become. (!)
So, my previous kindle case project CLICK HERE TO SEE, is still going strong and indeed it is still getting compliments and doing it's job very well indeedy - but, you know ... I had the urge to create a hollow book for it too :)
Hollow books are to keep your valued treasures in, and my kindle may be replaceable, but it is still a treasure. Also, it is kinda ironic ... a book ... to protect it's big bad nemesis.
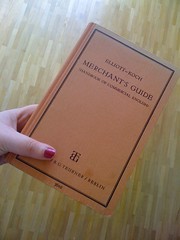
Last weekend, I went to the Stuttgart fleamarket. They have one every Saturday in the city centre - so i went mooching for old books that would be a comfortable fit. Concentrating on thickness, width and length - I sized up my kindle so it would fit well within it. (I opened the book at it's first page and made sure that it sat well on it and still had a healthy border of book all around it).
It must have been a good day ... because I found 3 books!
WHAT YOU NEED TO GET STARTED ...
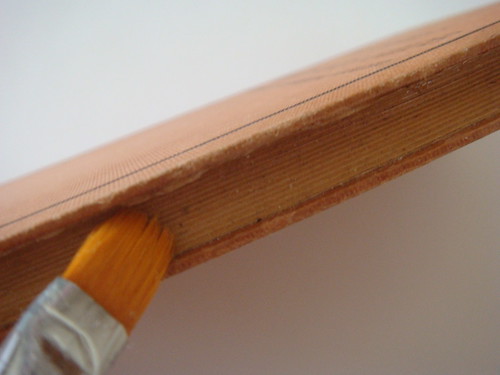
When the book is closed ... start gluing the eges of the book - like so ... all the way round.
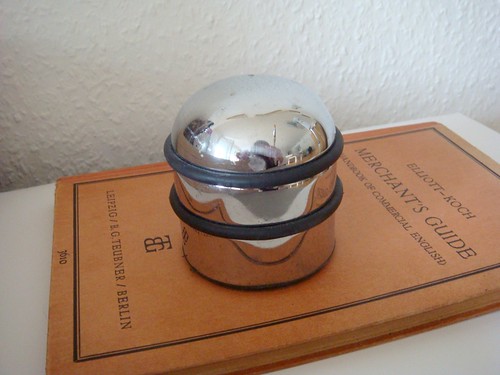
put pressure on it whilst it is drying. Using some form of weight, I used the door stop :)
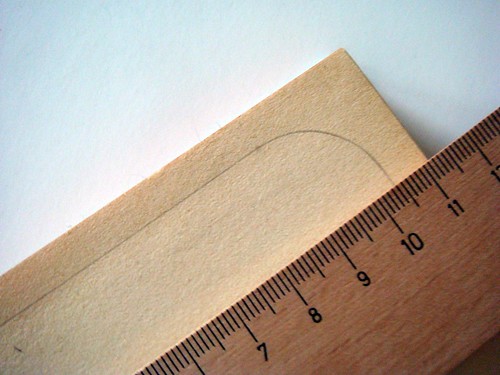
Once dry ... Open book and mark out with a pencil the outline you would like ... do not go too close to the edge if you can help it.
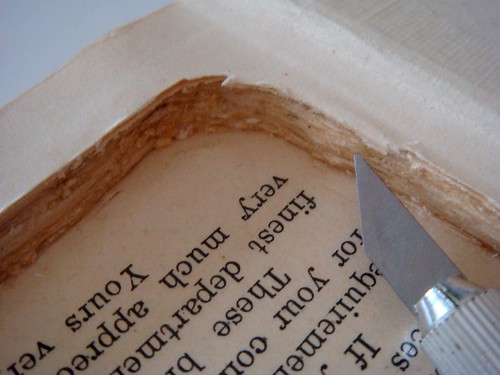
and then ... get your scalpel at the ready ... start cutting, around the edges.
Keep on going until you have a hollow hole, as deep as you need it to be - in the right size. remember if you are making something to be a snug fit (like me and my kindle) - to keep that handy so you can check that you are cutting the right size and shape!
After a while - you will really see it start to take form.
Once you are happy with the size and shape. Glue the inside paper rims that you have cut and leave to dry. This will strengthen the pages more so.
So - really, then you are finished! Simple eh?
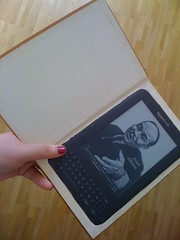
A hollow book, snug fit for your kindle (would be perfect for iphone, ipad too!)
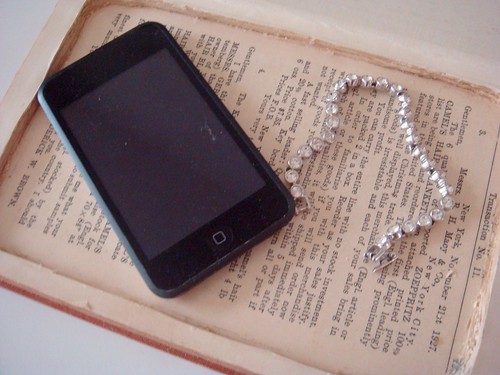
or just a hollow book to hide some other treasure you may want to keep in an unsuspecting place.
I can be in the best of company - and I imagine I am becoming quite rude and unsociable, but OK, I don't mind being in the pub with my fella and his buds, but if the talk becomes too technical (about beer/football... etcetera) then whilst they're supping booze, i'll be more than happy to curl up in the corner, order a cuppa tea and start reading!!!
I think i am going to have to start separating myself from it ... leave it at home and go cold turkey on it so when I am out in company, I can concentrate on friends, regardless of how technical the subject may become. (!)
So, my previous kindle case project CLICK HERE TO SEE, is still going strong and indeed it is still getting compliments and doing it's job very well indeedy - but, you know ... I had the urge to create a hollow book for it too :)
Hollow books are to keep your valued treasures in, and my kindle may be replaceable, but it is still a treasure. Also, it is kinda ironic ... a book ... to protect it's big bad nemesis.
Last weekend, I went to the Stuttgart fleamarket. They have one every Saturday in the city centre - so i went mooching for old books that would be a comfortable fit. Concentrating on thickness, width and length - I sized up my kindle so it would fit well within it. (I opened the book at it's first page and made sure that it sat well on it and still had a healthy border of book all around it).
It must have been a good day ... because I found 3 books!
WHAT YOU NEED TO GET STARTED ...
- Book (Hardcover) size suited to what you need/want
- Paintbrush
- Modpodge / PVA clear drying water based glue
- Scalpel
When the book is closed ... start gluing the eges of the book - like so ... all the way round.
and then ... get your scalpel at the ready ... start cutting, around the edges.
Once you are happy with the size and shape. Glue the inside paper rims that you have cut and leave to dry. This will strengthen the pages more so.
So - really, then you are finished! Simple eh?
A hollow book, snug fit for your kindle (would be perfect for iphone, ipad too!)
or just a hollow book to hide some other treasure you may want to keep in an unsuspecting place.
Friday, January 28, 2011
January Moods ... Necklace ...
First thing is first ... you may have already seen this before ... as I have been "pimping" photographs of this baby since mid-week. Pimping it out at all of my usual haunts ... Bead Buddies, Crafteroo and of course my Flickr account ... and now i am here at my blog... days later!
Surely the blog should have the exclusive, non?
Hmmm ... will definitely keep that in mind from now on.
Recently I have rekindled my obsession with blogs.
My blog, strangers blogs, friends blogs, foreigners blogs, picture blogs, wordy blogs, people who can waffle on for hours, people who like to post competitions, gossip, tutorials ... Really there's not much that I don't like to read, especially when blogs following people who are interesting in beading, or other crafts - papercraft, sewing, lampworking ... and the list goes on!
So, this creation is dedicated to 2 blogs that I am a follower of ...
Operation, tackle that bead stash!
who posted a "January Mood Board" with a purple/gold colour theme.
Oooh yeah purple and gold, a colour theme that really made me want to create something ... and ...
djinn rummy
Lesley posted a version of this necklace in a red valentine colour theme (absolutely lush!) and pointed readers in the right direction of where to go find the free tutorial.
Put the 2 together, and I got this necklace.
It is now in the safe hands of it's new owner :)
If i was to do it again, i would change the colour of the thread, i used a gold (having no purple thread in my stash ... shame on me, afterall purple IS my favourite colour) and you can see it through the swaros, ho-hum ... lesson learnt. :)
Hope you like it! ♥ :) ♥
and of course ... a link for the tutorial for you ...
The Garden Necklace
Surely the blog should have the exclusive, non?
Hmmm ... will definitely keep that in mind from now on.
Recently I have rekindled my obsession with blogs.
My blog, strangers blogs, friends blogs, foreigners blogs, picture blogs, wordy blogs, people who can waffle on for hours, people who like to post competitions, gossip, tutorials ... Really there's not much that I don't like to read, especially when blogs following people who are interesting in beading, or other crafts - papercraft, sewing, lampworking ... and the list goes on!
So, this creation is dedicated to 2 blogs that I am a follower of ...
Operation, tackle that bead stash!
who posted a "January Mood Board" with a purple/gold colour theme.
Oooh yeah purple and gold, a colour theme that really made me want to create something ... and ...
djinn rummy
Lesley posted a version of this necklace in a red valentine colour theme (absolutely lush!) and pointed readers in the right direction of where to go find the free tutorial.
Put the 2 together, and I got this necklace.
It is now in the safe hands of it's new owner :)
If i was to do it again, i would change the colour of the thread, i used a gold (having no purple thread in my stash ... shame on me, afterall purple IS my favourite colour) and you can see it through the swaros, ho-hum ... lesson learnt. :)
Hope you like it! ♥ :) ♥
and of course ... a link for the tutorial for you ...
The Garden Necklace
Tuesday, May 11, 2010
How to make beaded beads - FREE TUTORIAL!
Yesterday was really a non-eventful day.
Monday Blues ...
Grey skies …
but I have been on no planes! *woop! woop!*
It was so quiet in the Stuttgart office today – my boss is in America for the week, and all the Business managers are in the UK for sales training. It was also kind of nice it being so quiet – it means that I can just keep my head down and get on with it. I was hoping not to have to return to Hungary for another 4 weeks or so, but I was asked to travel next week to train our new designer. She has worked with us before, but so many things has happened since she left; new team, new products, new location … so I have been asked (very nicely) if I would go with her and introduce her to the R&D team. No problemo!
I was happy to put my name down for a bookmark swap today, I wonder who I will get as my partner ... hmm … I have so many lovely beads, and loadsa ideas already whirring round in my brain so I’m sure I’ll be able to make something nice!
Last evening, also – not much happening! I made sweet thai chicken wraps for Joe and I for dinner and I have stared at my beads … yes … stared at them! *oh the Monday blues also affect the mojo!*
So, rather than feeling a failure on the creative side – I applied myself to write up the beaded bead tutorial for you all. My goodness – it really is hard work isn’t it?! God knows how you all write beading instructions! I got in such a twaddle with it from the word go! I had major brain farts!
If you were all sat round the table with me, it would be so much easier to explain …
So, with my apologies – here are the instructions!
You’d probably be better just looking at the pictures!! :p *lol*
*** ***
You need per bead:
• 6mm Pearl rounds – x4
• 4mm Crystal Bicones – x8
• Seedies
In complementing colours
You can substitute the main beads for different sizes – as long as there is a maximum of 2mm in size difference between the round beads and bicones, they will sit well together.
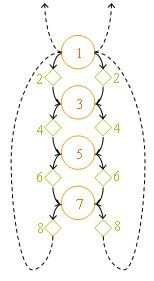
1: 30cms of string should suffice! String the first pearl bead, taking it to the centre of the thread – and making sure both ends of the line is of the same length.
2: Continue by adding 1 bicone on each end of the string,
3: Add on another pearl bead and cross both lines through.
4: Continue by adding 1 bicone on each end of the string,
5: Add on another pearl bead and cross both lines through.
6: Again adding 1 bicone on each end of the string,
7: Add on another pearl bead and cross both lines through.
8: Finally the last 2 bicones
9: Once complete – string the strings back through bead #1 and pull tight. (Ensure that the sting on the right side, enters bead #1 from the right side, and that the string on the left side enters bead #1 from the left side – otherwise you will get a tangled string.)
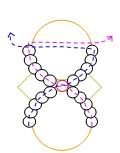
1: When the bead is now bunched together, you start to see the base of the bead. Now it is time to embellish it with seedies. The quantity of seed beads does depend on the size of seed beads that you want to use (I personally try to keep tm as small as possible) and it also depends on what size you have used for your main pearl beads.
String on each side seed beads so when they meet together, they meet in the middle of the big pearl beads comfortably.
2: When they meet in the middle, you use 1 bead to thread both strings through (see red bead) and you work your way out again to the next pearl bead so it forms an “X” and then the ends thread through the next main bead. Repeat another 3 times around the bead!
See, now you have it!
What I do to finish off, I then use the remaining strings to thread through the bicones once again, with half-hich knots inbetween. Then once finished, cut it short with a dab of glue!!
If you make any - would love to see them! Send me the link of your photos!
Thanks!
Monday Blues ...
Grey skies …
but I have been on no planes! *woop! woop!*
It was so quiet in the Stuttgart office today – my boss is in America for the week, and all the Business managers are in the UK for sales training. It was also kind of nice it being so quiet – it means that I can just keep my head down and get on with it. I was hoping not to have to return to Hungary for another 4 weeks or so, but I was asked to travel next week to train our new designer. She has worked with us before, but so many things has happened since she left; new team, new products, new location … so I have been asked (very nicely) if I would go with her and introduce her to the R&D team. No problemo!
I was happy to put my name down for a bookmark swap today, I wonder who I will get as my partner ... hmm … I have so many lovely beads, and loadsa ideas already whirring round in my brain so I’m sure I’ll be able to make something nice!
Last evening, also – not much happening! I made sweet thai chicken wraps for Joe and I for dinner and I have stared at my beads … yes … stared at them! *oh the Monday blues also affect the mojo!*
So, rather than feeling a failure on the creative side – I applied myself to write up the beaded bead tutorial for you all. My goodness – it really is hard work isn’t it?! God knows how you all write beading instructions! I got in such a twaddle with it from the word go! I had major brain farts!
If you were all sat round the table with me, it would be so much easier to explain …
So, with my apologies – here are the instructions!
You’d probably be better just looking at the pictures!! :p *lol*
*** ***
You need per bead:
• 6mm Pearl rounds – x4
• 4mm Crystal Bicones – x8
• Seedies
In complementing colours
You can substitute the main beads for different sizes – as long as there is a maximum of 2mm in size difference between the round beads and bicones, they will sit well together.
You start building the bead by using Right Angle Weave
(double thread stringing method)
1: 30cms of string should suffice! String the first pearl bead, taking it to the centre of the thread – and making sure both ends of the line is of the same length.
2: Continue by adding 1 bicone on each end of the string,
3: Add on another pearl bead and cross both lines through.
4: Continue by adding 1 bicone on each end of the string,
5: Add on another pearl bead and cross both lines through.
6: Again adding 1 bicone on each end of the string,
7: Add on another pearl bead and cross both lines through.
8: Finally the last 2 bicones
9: Once complete – string the strings back through bead #1 and pull tight. (Ensure that the sting on the right side, enters bead #1 from the right side, and that the string on the left side enters bead #1 from the left side – otherwise you will get a tangled string.)
1: When the bead is now bunched together, you start to see the base of the bead. Now it is time to embellish it with seedies. The quantity of seed beads does depend on the size of seed beads that you want to use (I personally try to keep tm as small as possible) and it also depends on what size you have used for your main pearl beads.
String on each side seed beads so when they meet together, they meet in the middle of the big pearl beads comfortably.
2: When they meet in the middle, you use 1 bead to thread both strings through (see red bead) and you work your way out again to the next pearl bead so it forms an “X” and then the ends thread through the next main bead. Repeat another 3 times around the bead!
See, now you have it!
What I do to finish off, I then use the remaining strings to thread through the bicones once again, with half-hich knots inbetween. Then once finished, cut it short with a dab of glue!!
If you make any - would love to see them! Send me the link of your photos!
Thanks!
Labels:
bead,
beadbuddies,
beaded,
beadweaving,
cats eyes,
free,
jewellery,
kitten,
pink,
smitten,
tutorial
Subscribe to:
Posts (Atom)